
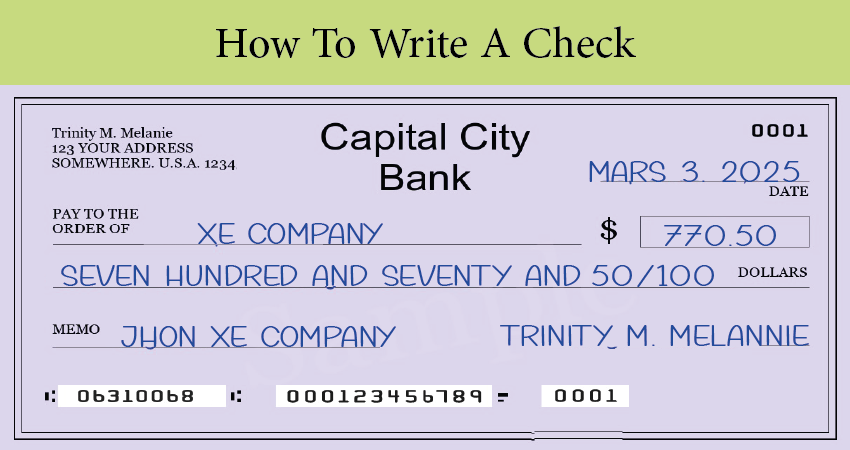
While many people use mobile apps and digital payments today, knowing how to write a check is still a valuable and important skill. You might need to write one for rent, bills, gifts, or official documents. A properly written check can be deposited, cashed, or used to make payments—just like money in hand
In this guide, I’ll walk you through each part of a check, step by step. We’ll break it down so you understand what to write, where to write it, and why each section matters. Even if you’ve never written a check before, you’ll be confident by the time you finish reading this.
Table of Contents
Why Does Writing a Check Matter?
When you write a check, you’re giving someone permission to withdraw a specific amount of money from your bank account. If even one section is filled out incorrectly, it can lead to:
- Payment delays
- Confusion or rejection by the bank
- Potential for fraud or theft
That’s why every line of a check serves a specific purpose, and it’s important to do it right.
Step 1: Write the Date
Where to write it: Top right-hand corner of the check.
Why it matters: The date shows when the check was written. Banks use the date to help determine when the check is valid and when it can be deposited.

How to do it: You can write the date in either of these formats:
- May 1, 2025
- 5/1/2025
- 2025-05-01
Just make sure your handwriting is clear and readable. Most of the time, you’ll write the current date, but in some cases, people postdate checks (write a future date) for scheduled payments. Be cautious with postdating—it doesn’t always stop a bank from processing the check early.
Step 2: Write the Payee’s Name
Where to write it: Line that says “Pay to the Order of.”
Why it matters: This tells the bank who is allowed to cash or deposit the check. If it’s incorrect, the check could be rejected or lost.
How to do it: Write the full legal name of the person, company, or organization you’re paying. Always double-check the spelling, especially for businesses.
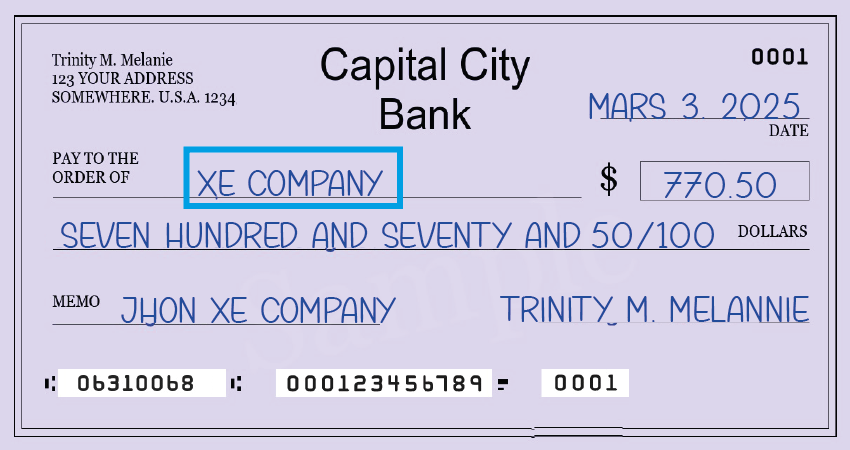
Examples:
- John M. Doe
- ABC Plumbing Services
- Cash (only if you want anyone to be able to cash it—use with caution!)
If you’re unsure about the exact name (especially for a business), ask them. It only takes a second but can prevent issues later.
Step 3: Write the Amount in Numbers
Where to write it: Small box on the right-hand side of the check, next to the payee line.
Why it matters: This shows the bank the exact amount of money you are authorizing to be withdrawn.
How to do it: Write the amount using digits, including dollars and cents. Start writing from the far-left side of the box to avoid any alterations.
Examples:
- $150.00
- $82.49
- $1,200.75

Tip: Always include two decimal places even if you’re writing a round number (e.g., $100.00). This makes the amount clear and helps prevent fraud. Leaving extra space could allow someone to change $100.00 into $1,000.00.
Step 4: Write the Amount in Words
Where to write it: Line directly below the payee’s name.
Why it matters: This is the legal amount of the check. If there’s a mistake or difference between the number box and the written amount, the bank will go by the words.
How to do it: Spell out the dollar amount in full, followed by the cents in fraction format (e.g., 45/100). Include the word “and” before the cents. If there’s extra space, draw a line to the end of the line to prevent any additional writing.

Examples:
- $150.00 → “One hundred fifty and 00/100”
- $82.49 → “Eighty-two and 49/100”
- $1,200.75 → “One thousand two hundred and 75/100”
Common mistake: Don’t write “cents”—use the fraction instead (e.g., 75/100, not “seventy-five cents”).
Step 5: Fill Out the Memo Line (Optional but Helpful)
Where to write it: Bottom left-hand corner of the check.
Why it matters: It’s a space to write a note or reference—especially helpful for personal records or when paying bills.
How to do it: Write a short note explaining the purpose of the check. This could be the month you’re paying rent for, an account number, or a gift note.
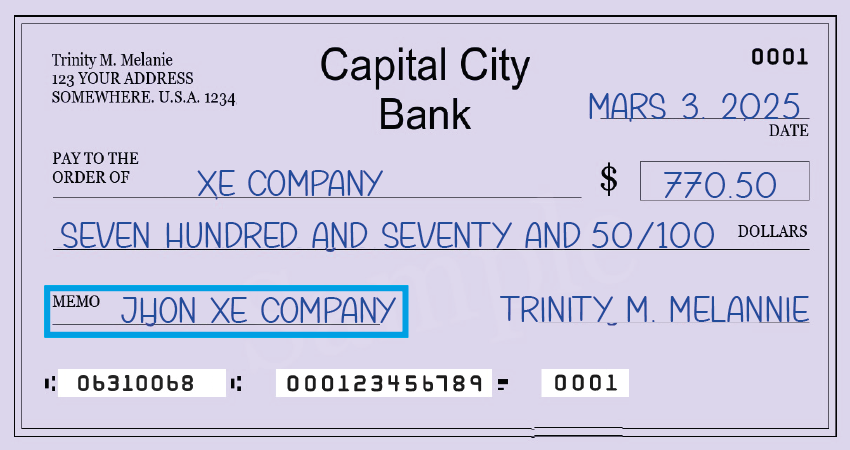
Examples:
- May Water Bill
- Invoice #2452
- Birthday gift for Sarah
- Wedding present
While it’s optional, filling in the memo line can help if there’s a dispute or if the check gets separated from other documents.
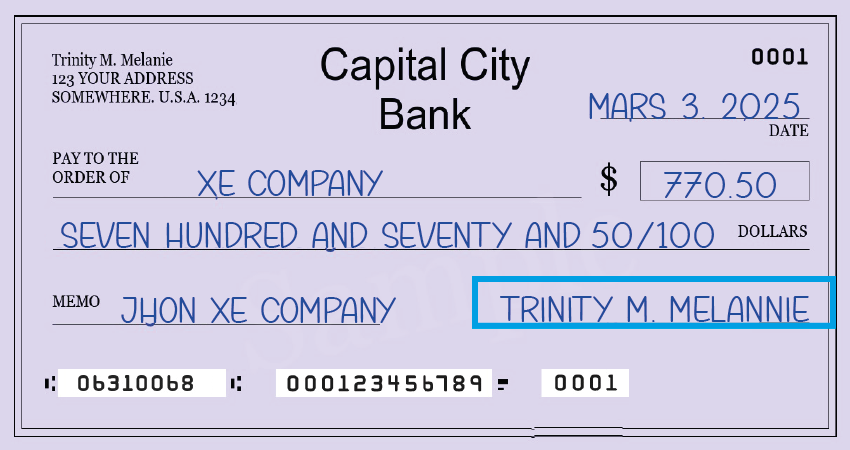
Step 6: Sign the Check
Where to write it: Bottom right-hand corner.
Why it matters: A check is not valid or usable without your signature. It confirms that you approve this payment.
How to do it: Sign your name exactly how it appears on your bank account. If your signature varies too much from the one on file, the bank may reject the check.
Pro Tip: Never sign a blank check. If something happens to it before you fill it out, someone could write in any amount and steal your money.
Don’t Forget to Record the Check in Your Checkbook
After you write the check, it’s smart to record the details in your checkbook or a digital tracking app. This includes:
- Check number
- Date
- Payee
- Amount
- Purpose (optional)
This helps you:
- Track your spending
- Avoid overdrafts
- Stay organized for taxes and budgeting
Final Tips for Writing Checks Safely
- Always use a blue or black ink pen.
- Keep your checks in a safe place.
- Tear up or destroy voided checks properly.
- Never leave blank lines on your check—fraudsters could fill them in.
- Consider using mobile payment options when possible—they’re faster and often more secure.
Conclusion
That’s it! Writing a check is simple once you understand each part. From dating the check to signing it, each section plays a role in making sure your payment goes through correctly and safely. With this guide, you now have the knowledge to write checks confidently—no more guessing or worrying about making a mistake.
Need to reference how to spell out dollar amounts? Consider keeping a quick guide nearby, or practice writing a few sample checks for different amounts to build your confidence.
Check Writing FAQs: Everything You Need to Know
If you’re wondering how to write a check correctly or have lingering questions about specific scenarios, you’re not alone. Even in today’s digital banking age, there are still plenty of situations where paper checks are necessary—like paying rent, covering a bill, or sending money to someone without a digital payment app.
Below, you’ll find answers to the most frequently asked questions about how to fill out a check, including how to write checks with or without cents, how to void a check, and more.
How do you write a check for $100?
To write a check for $100, start by entering “100.00” in the numerical box. On the line below that, write the amount in words as:
One hundred and 00/100 dollars
Draw a line after the written amount to prevent anyone from altering the check. For example:
One hundred and 00/100 dollars ———
This line fills the space and prevents fraud. Always double-check the amount in both number and word format to ensure consistency.
How do you write a check for larger amounts?
Here are some examples of how to write larger dollar amounts:
- $150 → One hundred fifty and 00/100
- $250 → Two hundred fifty and 00/100
- $500 → Five hundred and 00/100
- $1,000 → One thousand and 00/100
- $1,500 → One thousand five hundred and 00/100
- $3,000 → Three thousand and 00/100
These formats help ensure clarity and prevent mistakes or fraud.
How do you write a check without cents?
If you are writing a check for a round amount with no cents (like $200), you still need to include the “00/100” in the written amount. Here’s an example:
Two hundred and 00/100 dollars
The numerical box would show “200.00.”
How do you write a check with cents only (like 50 cents)?
While not common, it’s possible to write a check for an amount like $0.50. Here’s how to do it:
- In the numeric box: 0.50
- In the written line: No dollars and 50/100 or Only fifty cents
You should also draw a line after the words to prevent tampering.
Can you write a check to yourself ?
Yes, writing a check to yourself is completely acceptable. You may want to do this if you’re transferring funds between your own accounts.
To do this, simply write your name in the “Pay to the Order of” line. Then, fill out the amount, sign it, and deposit the check into your other account.
How do you void a check ?
Voiding a check is easy:
- If the check has already been filled out, write “VOID” across the front in large, bold letters.
- If you are voiding it for purposes like setting up direct deposit, you may also want to write “VOID” on the back.
Never sign a blank check unless you’re giving it directly to a trusted employer for direct deposit. If the check is no longer needed, shred it after voiding.
Can you write a check in pencil?
No, you should never write a check in pencil. It can easily be erased and altered, making it highly insecure.
Always use a black or blue permanent ink pen when writing a check to protect yourself from fraud or accidental changes.
How do I submit a check via mobile deposit?
If your bank offers mobile deposit through their app, follow these steps:
- Endorse the back of the check with your signature.
- Write “For mobile deposit only” underneath your signature.
- Use the app to take a picture of the front and back of the check.
- Submit it for deposit.
Always check with your bank’s specific requirements, as some may differ slightly.
What is postdating a check?
Postdating a check means writing a future date on the check, rather than the current one. People do this if they want to delay when the recipient can cash it.
Warning: Just because you postdate a check doesn’t guarantee that the bank will hold it. Some banks will process the check before the date if it’s presented.
What is the number in the top right corner of a check?
That number is your check number, which helps both you and your bank keep track of individual checks. It’s useful when reconciling your account or reporting a lost or stolen check.
What do the numbers at the bottom of a check mean?
At the bottom of every check, you’ll find three sets of numbers:
- Routing number – Identifies your bank.
- Account number – Identifies your specific bank account.
- Check number – Matches the number printed in the top right.
These numbers help banks process your check properly and ensure the money is taken from the correct account.
What is a blank check?
A blank check is one that has been signed but not filled out. This is risky, as someone could write in any amount and pay themselves or another person.
Never sign a check until all other fields are completed. This protects you from potential fraud.
Who signs the back of a check?
The back of a check is signed by the recipient, also known as the endorser. If you’re depositing or cashing a check, you must sign the back.
If depositing via mobile, add “For mobile deposit only” along with your signature.
How do I write a check to more than one person?
If you’re writing a check to two people (e.g., a wedding gift), consider how the names are written:
- John or Jane Smith – Either can deposit the check.
- John and Jane Smith – Both must sign it, and may need a joint account to deposit it.
Use “or” when in doubt to make it easier for the recipients.
What are alternatives to writing checks?
If you prefer not to write checks, here are some great alternatives:
- Paying online through your bank’s bill-pay system
- Debit or credit card for purchases
- Money transfer apps like Zelle, PayPal, Cash App, or Venmo
- Bank transfers for more secure payments
- Direct deposit for payroll or government payments
However, checks are still useful in many situations, like paying rent or businesses that don’t accept digital payments.
Can I write my own check?
Yes, absolutely. Anyone with a checking account can write a check as long as there are sufficient funds. Just be sure to fill out all sections properly, write legibly, and sign the check.
Final Tips: Keeping Your Checks Organized
Final Tips: Keeping Your Checks Organized
Even if you rarely use checks, it’s a good idea to:
- Keep at least one checkbook on hand.
- Store your checks in a secure place.
- Record each check in your check register or banking app to avoid overdrafts.
Writing a check may seem outdated, but it’s still an essential skill. Whether you’re paying a bill, transferring funds, or giving a gift, knowing how to write a check correctly gives you more financial flexibility and security.